I wanted to update my IRC client without disconnecting from every network. Simple enough ask, right?
Relay gave me the IRC client experience I wanted across the web, desktop, and mobile, but it was making the upstream IRC connections itself. Updating or redeploying Relay meant disconnecting from every network and making everyone else watch me quit and rejoin.
That is what pushed me toward Soju. Soju is a modern IRC bouncer that sits between Relay and the IRC networks. Relay can come and go, while Soju keeps the real upstream connections alive, keeps channels joined, and stores the backlog.
The final setup is simple. Getting there was not. The documentation tells you what the individual settings do, but it is easy to mix up which password belongs to which connection, which certificate a fingerprint refers to, or which process you are actually reconnecting. I managed to hit all three.
Here is the full setup, from installing Soju on Debian or Ubuntu to moving Relay over to it. I’ll cover TLS and certificate renewal, both SASL options, Soju-TUI, and the things that tripped me up along the way.
I also maintain a public Relay + Soju runbook with the setup procedure, administration commands, and rollback steps. I wrote this post to explain the decisions and the problems I hit along the way. Keep the runbook handy when you are actually at the terminal.
What I Was Building
There are three connections to keep straight:
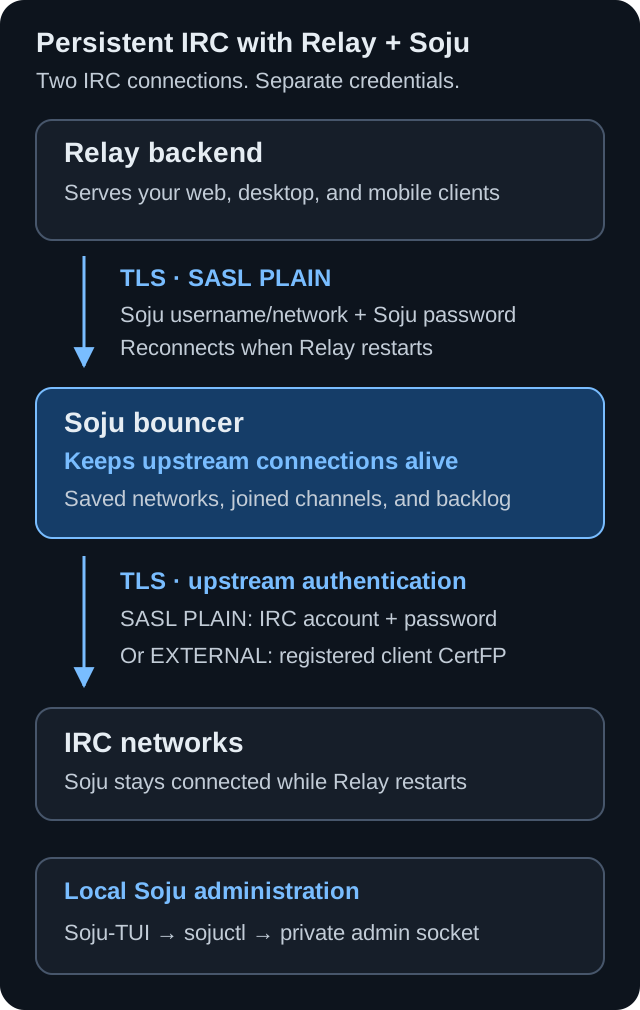
- Browser or app to Relay: the normal Relay web, desktop, or mobile session.
- Relay to Soju: native IRC over TLS, authenticated with the Soju username and password.
- Soju to each IRC network: a persistent upstream TLS connection authenticated with that network’s SASL credentials or a client certificate.
That separation is the whole point. I can restart or replace the Relay container and Relay only has to reconnect to Soju. Soju remains connected to the IRC networks, so the upstream servers do not see me quit and rejoin.
It also explains most of the confusing fields later in the setup. Relay is not authenticating directly to NickServ anymore. It authenticates to Soju, and Soju authenticates upstream.
Before You Start
I use Relay here because it is my client. Soju also works with other compatible IRC clients: connect them to the bouncer’s hostname and TLS port using the Soju credentials. A standalone desktop or terminal client connects directly to Soju, so you can skip Relay’s browser/backend layer.
The commands below target Debian/Ubuntu with systemd. The same architecture applies on other Linux distributions, but package availability, paths, service commands, and renewal scheduling can differ. Check your distribution’s Soju package and installed manuals before following along.
The examples below use placeholders. Replace them with values from your environment:
<SOJU_HOST>             DNS name Relay uses to reach Soju
<SOJU_BIND_ADDRESS>     Private, VPN, or otherwise protected listener address
<SOJU_USER>             Soju account used by one Relay account
<SOJU_PASSWORD>         Password for that Soju account
<NETWORK>               Stable short name for an IRC network
<IRC_SERVER>            Upstream IRC server hostname
<IRC_NICK>              Nickname used on that network
<IRC_IDENT>             IRC username/ident
<IRC_REAL_NAME>         IRC real name
<IRC_ACCOUNT>           Upstream NickServ account
<IRC_ACCOUNT_PASSWORD>  Upstream NickServ password
I prefer a private path between Relay and Soju: site-to-site WireGuard, a private network, or a Docker-reachable host address. TCP/6697 should be reachable from Relay, not necessarily from the whole internet.
Back up Relay’s persistent data before changing an existing network. Get Soju ready first, then edit the network you already have in Relay. There is no reason to delete it and lose your saved channel and UI settings.
DNS, TLS, and the Reverse Proxy Question
This was one of the first things I overthought.
Soju handles native IRC over TLS itself. It does not need an HTTP reverse proxy in front of its IRC listener. You need:
- A hostname that resolves to the Soju server from Relay
- A certificate that matches that hostname
- An
ircs://listener in Soju - A route and firewall rule that let Relay reach TCP/6697
Setting hostname in Soju does not create DNS, obtain a certificate, or open the port. It only tells Soju its server name. An existing wildcard DNS record may already make the hostname resolve, which can make it look like no DNS work was required.
An Nginx Proxy Manager host or a normal Cloudflare Tunnel used for Relay’s website is a different connection entirely. Standard HTTP proxying does not forward raw IRC/TLS. Leave the browser-to-Relay proxy in place if you use one, but let Soju handle its own IRC/TLS listener.
I used a Let’s Encrypt certificate with DNS-01 validation because the Soju service itself did not need to be public. DNS-01 proves ownership through a TXT record, so certificate issuance works even when the IRC listener is reachable only over a private route.
For Cloudflare-managed DNS, install Certbot and the DNS plugin:
sudo apt update
sudo apt install -y certbot python3-certbot-dns-cloudflare

sudo install -d -m 0700 /root/.secrets/certbot
sudoedit /root/.secrets/certbot/cloudflare.ini
The credentials file contains a restricted API token with DNS edit permission for only the required zone:
dns_cloudflare_api_token = <CLOUDFLARE_DNS_API_TOKEN>
Protect it and request the certificate:
sudo chmod 0600 /root/.secrets/certbot/cloudflare.ini

sudo certbot certonly \
  --dns-cloudflare \
  --dns-cloudflare-credentials /root/.secrets/certbot/cloudflare.ini \
  --dns-cloudflare-propagation-seconds 60 \
  --email <ACME_EMAIL> \
  --agree-tos \
  --non-interactive \
  -d <SOJU_HOST>
If you use another DNS provider, use its supported Certbot or ACME plugin. The exact flag names differ, but the process is the same. I would avoid manual DNS validation here unless you automate it with hooks. Having to remember a TXT record change at every renewal is exactly the sort of maintenance I will eventually forget.
Install Soju
On Debian or Ubuntu, the packaged install is straightforward:
sudo apt update
sudo apt install -y soju soju-utils
soju is the bouncer service. sojuctl is the administration client included with soju-utils.
The package creates the soju system account and a systemd service. I kept Soju as its own system service instead of putting it inside the Relay stack. That separation is intentional: redeploying Relay should not restart the thing maintaining the upstream IRC connections.
Give Soju a Protected Copy of the Certificate
Pointing Soju directly at the symlinks under /etc/letsencrypt/live can turn into a permissions mess. I copy the current certificate into a root-owned directory readable by the soju group.
Run sudo certbot certificates first. Replace <CERTIFICATE_NAME> below with the actual lineage directory name it reports, which may include a suffix such as -0001.
sudo install -d -o root -g soju -m 0750 /etc/soju/tls

sudo install -o root -g soju -m 0644 \
  /etc/letsencrypt/live/<CERTIFICATE_NAME>/fullchain.pem \
  /etc/soju/tls/fullchain.pem

sudo install -o root -g soju -m 0640 \
  /etc/letsencrypt/live/<CERTIFICATE_NAME>/privkey.pem \
  /etc/soju/tls/privkey.pem
Never make the private key world-readable. Soju only needs group-readable access through its service account.
Configure Soju
Create the message-store directory:
sudo install -d -o soju -g soju -m 0750 /var/lib/soju/logs
Then create /etc/soju/config:
db sqlite3 /var/lib/soju/main.db
message-store fs /var/lib/soju/logs/

# Bind to an address Relay can reach. If this is 0.0.0.0,
# restrict TCP/6697 with the firewall.
listen ircs://<SOJU_BIND_ADDRESS>:6697

# Private local administration for sojuctl and Soju-TUI.
listen unix+admin://

tls /etc/soju/tls/fullchain.pem /etc/soju/tls/privkey.pem
hostname <SOJU_HOST>
title Private IRC Bouncer
Protect the config and key:
sudo chown root:soju /etc/soju/config
sudo chmod 0640 /etc/soju/config
sudo chown root:soju /etc/soju/tls/fullchain.pem /etc/soju/tls/privkey.pem
sudo chmod 0640 /etc/soju/tls/privkey.pem
The unix+admin:// listener matters. sojuctl connects to Soju through the private administrative socket, normally /run/soju/admin. Do not expose that admin listener over TCP. Anyone with access to it can administer the bouncer and its users.
Start and verify the service:
sudo systemctl enable soju
sudo systemctl restart soju
sudo systemctl is-active soju
sudo systemctl status --no-pager --full soju
sudo ss -ltnp | grep -E ':6697\b'
From the Relay host or another client on the same route, test the exact hostname and certificate that Relay will use:
openssl s_client \
  -connect <SOJU_HOST>:6697 \
  -servername <SOJU_HOST> \
  -verify_hostname <SOJU_HOST> \
  -verify_return_error \
  -CAfile /etc/ssl/certs/ca-certificates.crt \
  </dev/null
Do not move on until that ends with Verify return code: 0 (ok). Disabling certificate verification in Relay only converts an obvious TLS problem into a quiet security problem.
Automate Certificate Renewal All the Way Through Soju
Certbot renewing the original certificate is only half the job. Soju is using the protected copy under /etc/soju/tls, so that copy needs to be refreshed too.
Use the same certificate lineage from the initial copy for SOURCE below. The Certbot renewal documentation explains how deploy hooks run after a successful renewal.
Create /etc/letsencrypt/renewal-hooks/deploy/soju-copy-cert:
#!/bin/sh
set -eu

SOURCE="/etc/letsencrypt/live/<CERTIFICATE_NAME>"
DEST="/etc/soju/tls"

if [ -n "${RENEWED_LINEAGE:-}" ] && [ "$RENEWED_LINEAGE" != "$SOURCE" ]; then
  exit 0
fi

install -d -o root -g soju -m 0750 "$DEST"
install -o root -g soju -m 0644 "$SOURCE/fullchain.pem" "$DEST/fullchain.pem"
install -o root -g soju -m 0640 "$SOURCE/privkey.pem" "$DEST/privkey.pem"

systemctl reload soju
Make it executable, run it once directly, and test renewal:
sudo chown root:root /etc/letsencrypt/renewal-hooks/deploy/soju-copy-cert
sudo chmod 0750 /etc/letsencrypt/renewal-hooks/deploy/soju-copy-cert

sudo /etc/letsencrypt/renewal-hooks/deploy/soju-copy-cert
sudo certbot renew --dry-run
The direct hook test checks the copy and Soju reload. The dry run checks Certbot’s renewal flow; it does not run deploy hooks by default. Soju reloads its TLS certificate on SIGHUP, which the packaged systemd reload uses. Changes to the database, message-store location, or listeners require a restart.
Finally, confirm that renewal is actually scheduled:
sudo systemctl list-timers --all | grep -i certbot
sudo systemctl status certbot.timer --no-pager
If your Certbot installation uses cron or another scheduler, verify that instead. Keep one renewal scheduler active, and monitor the certificate served on TCP/6697 for expiry. Issuing a certificate successfully today does not prove renewal will happen later.
Create a Soju User
I created one Soju user for each Relay account. Multiple people or separate Relay accounts should not share a single Soju identity.
sudo sojuctl -config /etc/soju/config \
  user create \
  -username <SOJU_USER> \
  -password '<SOJU_PASSWORD>' \
  -admin false \
  -nick <IRC_NICK> \
  -realname '<IRC_REAL_NAME>'
An administrative account can use -admin true, but not every account needs that access.
Passwords passed as command arguments can appear in shell history or process listings. Use a trusted administrative session, keep your terminal capture out of screenshots, and do not paste expanded commands into an issue or chat.
Add Networks Without Fighting the Existing Connections
I created each network with -enabled false first. That gave me time to configure authentication without having Soju compete with Relay’s old direct connection for the same nickname.
sudo sojuctl -config /etc/soju/config \
  user run <SOJU_USER> network create \
  -name <NETWORK> \
  -addr ircs://<IRC_SERVER>:6697 \
  -nick <IRC_NICK> \
  -username <IRC_IDENT> \
  -realname '<IRC_REAL_NAME>' \
  -enabled false
The network name should be short and stable. It becomes part of the login Relay uses later: <SOJU_USER>/<NETWORK>.
Check what Soju saved:
sudo sojuctl -config /etc/soju/config \
  user run <SOJU_USER> network status
Choose the Upstream Authentication Method
Relay always authenticates to Soju with the Soju credentials in this setup. This section is about the separate Soju to IRC network connection.
Option 1: SASL PLAIN
For password authentication, save the upstream NickServ account credentials in Soju:
sudo sojuctl -config /etc/soju/config \
  user run <SOJU_USER> sasl set-plain \
  -network <NETWORK> \
  <IRC_ACCOUNT> \
  '<IRC_ACCOUNT_PASSWORD>'
This is where Soju stores the upstream account credentials for SASL PLAIN. Keep them separate from the Soju login and the generic IRC server PASS field. You may also use the account password for a one-time NickServ identification when enrolling a certificate, as covered below.
Option 2: CertFP with SASL EXTERNAL
I preferred CertFP where the network supported it. Soju generates a client certificate scoped to that user and network:
sudo sojuctl -config /etc/soju/config \
  user run <SOJU_USER> certfp generate -network <NETWORK>

sudo sojuctl -config /etc/soju/config \
  user run <SOJU_USER> certfp fingerprint -network <NETWORK>
certfp generate enables SASL EXTERNAL. There is no sasl set-external command in current Soju releases.
This is where the naming gets confusing. There are two different fingerprints, and mixing them up caused me real trouble:
certfp fingerprintshows the client certificate Soju presents to the IRC network for SASL EXTERNAL.network update -certfp ...pins the IRC server certificate and replaces normal CA validation.
Those are opposite sides of the TLS connection. Do not copy the client fingerprint into the server-pin field. If the upstream IRC server has a normal publicly trusted certificate, the server TLS fingerprint field should be empty.
Cut Relay Over to Soju
Once Soju was ready, I edited the existing Relay network in place.
Use these values in Relay:
| Relay setting | Value |
|---|---|
| Server | <SOJU_HOST> |
| Port | 6697 |
| Secure connection (TLS) | Enabled |
| Trusted certificates only | Enabled |
| Top-level Password | Empty |
| Authentication | Username + password (SASL PLAIN) |
| Authentication account | <SOJU_USER>/<NETWORK> |
| Authentication password | <SOJU_PASSWORD> |
| Nick / Username / Real name | Your desired upstream identity |
The top-level Password field is the IRC server PASS field. It is not the Soju password and it is not the NickServ password. Put the Soju password in Relay’s SASL PLAIN authentication section.
Save the network once, then enable the staged Soju network:
sudo sojuctl -config /etc/soju/config \
  user run <SOJU_USER> network update <NETWORK> -enabled true
At this point the traffic should look like this:
Relay -- SASL PLAIN with Soju password --> Soju
Soju -- SASL PLAIN or EXTERNAL/CertFP --> IRC network
Seeing SASL PLAIN in Relay’s diagnostics is correct. It describes Relay’s immediate connection to Soju. It does not tell you which SASL method Soju uses upstream.
Register and Test the Soju Client Certificate
The order matters here. Generate the certificate, connect with it, register it with NickServ, then reconnect upstream to test automatic login:
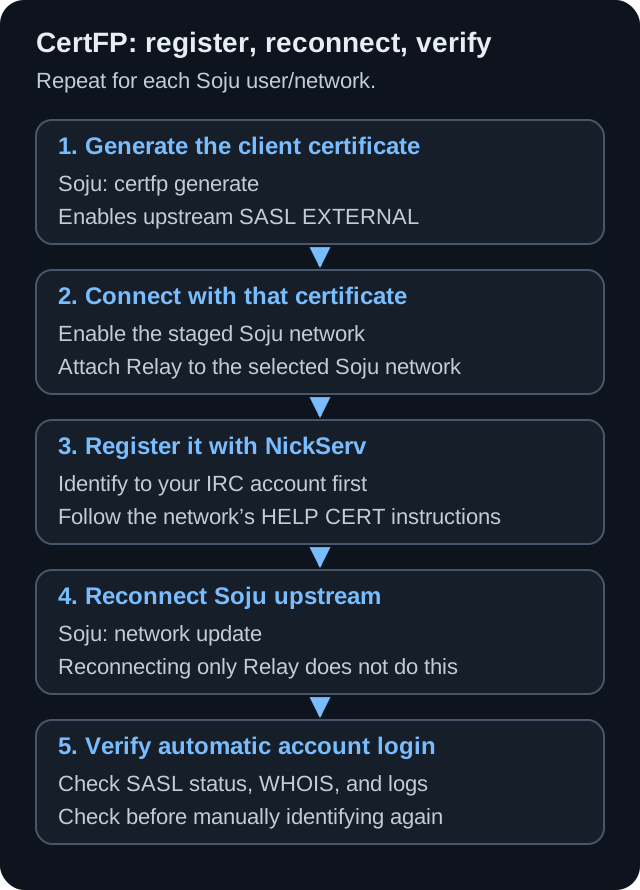
For a CertFP network, connect through Soju and identify to the upstream account once using that network’s documented NickServ syntax:
/msg NickServ IDENTIFY <IRC_ACCOUNT> <IRC_ACCOUNT_PASSWORD>
/msg NickServ HELP CERT
/msg NickServ CERT ADD
/msg NickServ CERT LIST
Some networks require the explicit fingerprint or use different syntax. Follow their HELP CERT output instead of assuming every services package behaves the same way.
Then force a real Soju to IRC network reconnect:
sudo sojuctl -config /etc/soju/config \
  user run <SOJU_USER> network update <NETWORK>
This is the reconnect that matters. Refreshing the browser or reconnecting Relay can leave Soju’s upstream connection running exactly as it was. Soju presents its client certificate during the upstream TLS handshake, so reconnect that network to test whether the newly registered certificate logs you in automatically.
Verify it:
sudo sojuctl -config /etc/soju/config \
  user run <SOJU_USER> sasl status -network <NETWORK>

sudo journalctl -u soju --since '2 minutes ago' --no-pager | \
  grep -Ei '<NETWORK>|SASL|certificate|logged in|registered|error'
The successful sequence should show Soju using the TLS client certificate, starting SASL EXTERNAL, logging into the account, and registering the connection.
Some IRC servers recognize the account without reporting it to Soju in the exact form sojuctl expects. If the status is unclear, check /whois, NickServ account status, CERT LIST, and the Soju log together. Seeing a certificate in the list is useful, but you still need to confirm that it worked on a fresh connection.
Join Channels and Verify Persistence
Join channels normally from Relay:
/join #channel
Soju saves the joined channel and rejoins it on future upstream connections. You can confirm the saved state from the server:
sudo sojuctl -config /etc/soju/config \
  user run <SOJU_USER> channel status -network <NETWORK>
Before calling it done, I checked the service, network, authentication, and saved channels:
sudo systemctl is-active soju

sudo sojuctl -config /etc/soju/config \
  user run <SOJU_USER> network status

sudo sojuctl -config /etc/soju/config \
  user run <SOJU_USER> sasl status -network <NETWORK>

sudo sojuctl -config /etc/soju/config \
  user run <SOJU_USER> channel status -network <NETWORK>
Then I restarted only Relay and confirmed that Soju remained connected upstream. Relay reconnected to the bouncer, the channel buffers came back, and the IRC networks never saw me leave. That was the entire reason for doing this.
Soju-TUI: Sojuctl Without Memorizing Every Command
sojuctl works well, but I do not particularly want to remember a long command every time I check a network or change a setting. It is also easy to forget which commands need to run as a particular Soju user. I built Soju-TUI to make those jobs easier from a terminal menu.
Soju-TUI runs sojuctl for you. You select the user, network, or channel, fill in the relevant fields, and review the command before applying a change. Passwords are hidden in that preview. Everything still goes through Soju’s private admin socket; the TUI itself does not handle your IRC connections or chat messages.
It can manage:
- Users, passwords, and administrator status
- Networks and upstream reconnects
- Channels and detached-channel settings
- SASL PLAIN and EXTERNAL/CertFP
- Host TLS certificate details and CertFP fingerprints
- Server status, notices, and debug state
It also checks which commands your running Soju version supports and shows the available actions.
Read-only actions run immediately. Changes require confirmation, and destructive actions require an exact typed phrase. Passwords are not saved in the profile, and the TUI does not edit Soju’s database or /etc/soju/config directly.
Soju must already have the admin listener:
listen unix+admin://
For Debian or Ubuntu, download the package matching the host architecture from the Soju-TUI releases, then install it and explicitly authorize the trusted local administrator:
sudo apt install ./soju-tui_VERSION-1_amd64.deb
sudo soju-tui-setup --user "$(id -un)"
soju-tui
Use the arm64 package on AArch64. The setup step handles access to the admin socket without granting a broad passwordless sudo rule. Normal TUI operation does not silently invoke sudo.
On first launch, review the Soju config, sojuctl path, hostname, admin socket, and TLS certificate paths it found. The saved local profile contains no passwords.
I still use sojuctl directly when it is convenient. The command preview in the TUI makes it easy to see what is happening and use the same operation from the shell later.
Optional Shell Helpers
If a full TUI is more than you want, a few shell functions make the common commands less painful:
export SOJU_CONFIG=/etc/soju/config

sj() {
  sudo sojuctl -config "$SOJU_CONFIG" "$@"
}

sj-user() {
  if [ "$#" -eq 0 ]; then
    sj user status
    return
  fi

  local user="$1"
  shift
  if [ "$#" -eq 0 ]; then
    sj user run "$user" network status
  else
    sj user run "$user" "$@"
  fi
}

sj-sasl() {
  sj-user "$1" sasl status -network "$2"
}

sj-channels() {
  sj-user "$1" channel status -network "$2"
}

sj-logs() {
  sudo journalctl -u soju -n "${1:-100}" --no-pager
}
That turns the routine checks into:
sj-user <SOJU_USER>
sj-sasl <SOJU_USER> <NETWORK>
sj-channels <SOJU_USER> <NETWORK>
sj-logs 80
Put them in .bashrc or .zshrc if you want them permanently. They use the existing sudo policy and should still prompt when required.
The Problems I Hit and How to Avoid Them
Most of my troubleshooting came down to old settings I had forgotten about and fields with names that sounded like they meant the same thing. Here is what I would check first next time.
Three Passwords That Are Not Interchangeable
| Location | What it actually means |
|---|---|
| Relay SASL PLAIN password | Password for the Soju user |
| Soju upstream SASL PLAIN credentials | NickServ/IRC account credentials |
Relay or Soju network Password / -pass |
IRC server-level PASS, usually empty |
Putting a NickServ password into the generic network Password field does not configure NickServ authentication. It sends an IRC PASS before registration. Unless the network operator gave you a server password, leave it empty.
A Server Certificate Pin Is Not CertFP Authentication
The Soju network -certfp setting pins the upstream server’s SHA-512 certificate fingerprint. The certificate generated by certfp generate is a client identity for SASL EXTERNAL.
I had a stale server TLS pin after the IRC server changed certificates. Soju correctly rejected the new certificate even though it was publicly trusted. Clearing the pin restored normal CA validation:
sudo sojuctl -config /etc/soju/config \
  user run <SOJU_USER> network update <NETWORK> -certfp=
Only pin a server certificate when you deliberately connect to a self-signed server and obtained the fingerprint through a trusted channel.
Hidden IRC PASS State Can Survive Long After You Forget It
I also had an old server PASS value stored on one network. The UI hid the password, as it should, but I had forgotten there was a value saved there at all. It likely contributed to the registration failures after the upstream network changed. I cannot say it was the only cause, because I was untangling the certificate issue at the same time.
If the server does not require PASS, clear it without deleting the whole network:
sudo sojuctl -config /etc/soju/config \
  user run <SOJU_USER> network update <NETWORK> -pass=
The recovery shortcut that clears both stale server-side settings while preserving the network, channels, and generated client certificate is:
sudo sojuctl -config /etc/soju/config \
  user run <SOJU_USER> network update <NETWORK> -certfp= -pass=
Deleting and recreating the Soju network would also clear them, but it would remove the network identity, channels, SASL configuration, and generated CertFP certificate. Fixing the two bad fields was safer.
Reconnect the Correct Hop
This one wasted the most time. Registering a certificate with NickServ does not alter the already-established TLS session. The certificate is used during the next upstream connection.
Refresh browser       != reconnect Relay to Soju
Reconnect Relay       != reconnect Soju to IRC
Update Soju network    = reconnect Soju to IRC
When testing SASL changes, run network update for the selected Soju network and watch the journal. Otherwise you may be testing old connection state while staring at new configuration.
Backups and Ongoing Maintenance
The Soju database, message store, config, TLS copy, and Certbot state all matter. At minimum, include these paths in the server’s protected backup plan:
/etc/soju/
/var/lib/soju/
/etc/letsencrypt/
Protect backups like production credentials. The Soju database and configuration can contain account details and authentication material, and the TLS directory contains a private key.
For a normal Relay update, I leave Soju alone and redeploy only Relay. A short Relay-to-Soju reconnect is expected. If the upstream networks see a quit, I check whether Soju also restarted or lost its upstream connection.
For Soju maintenance, I check the installed manual and command help before copying commands from the internet:
man soju
man sojuctl
sudo sojuctl -config /etc/soju/config help
The official Soju manual and sojuctl manual explain the configuration and administration model. For version-specific syntax, prefer the manuals installed with your package; the online documentation can describe a newer release.
For a repeat deployment or recovery, I keep these two references in the public runbook:
- Setup and migration guide: installation, TLS renewal, authentication, cutover checks, and rollback.
- Administration cheat sheet: shell helpers and everyday user, network, channel, SASL, and certificate operations.
Was It Worth It?
Yes. Once the connection layers were separated correctly, the setup became exactly as boring as infrastructure like this should be.
I can update Relay, restart it, or connect from another device while Soju keeps the upstream connections running, the channels joined, and the backlog available. That is what I wanted in the first place.
What finally made troubleshooting easier was checking each connection separately. Can Relay log into Soju? Can Soju connect upstream? Does the IRC network accept the certificate? Working through those questions in order was a lot more useful than changing passwords and reconnecting things until something happened.
If you are building the same setup, start with the architecture, keep the password and certificate roles separate, stage networks disabled, and always reconnect the hop you actually changed. That will save you most of the time I spent learning it the hard way.
Terminal administration interface: Soju-TUI
Official project and manuals: soju.im
Comments
Questions, corrections, and follow-ups live in GitHub Discussions.